What is ASP.NET Core Identity
ASP.NET Core Identity is a membership system. It allows us to create, read, update and delete user accounts. Supports account confirmation, authentication, authorisation, password recovery, two-factor authentication. It also supports external login providers like Microsoft, Facebook, Google etc.
Scaffold Identity in ASP.NET Core projects
ASP.NET Core provides ASP.NET Core Identity as a Razor Class Library. Applications that include Identity can apply the scaffolder to selectively add the source code contained in the Identity Razor Class Library (RCL). You might want to generate source code so you can modify the code and change the behavior. For example, you could instruct the scaffolder to generate the code used in registration. Generated code takes precedence over the same code in the Identity RCL. To gain full control of the UI and not use the default RCL, see the section Create full Identity UI source.
Applications that do not include authentication can apply the scaffolder to add the RCL Identity package. You have the option of selecting Identity code to be generated.
Although the scaffolder generates most of the necessary code, you need to update your project to complete the process. This document explains the steps needed to complete an Identity scaffolding update.
We recommend using a source control system that shows file differences and allows you to back out of changes. Inspect the changes after running the Identity scaffolder.
Services are required when using Two Factor Authentication, Account confirmation and password recovery, and other security features with Identity. Services or service stubs aren’t generated when scaffolding Identity. Services to enable these features must be added manually. For example, see Require Email Confirmation.
ASP.NET core identity setup in blazor using Scaffolded
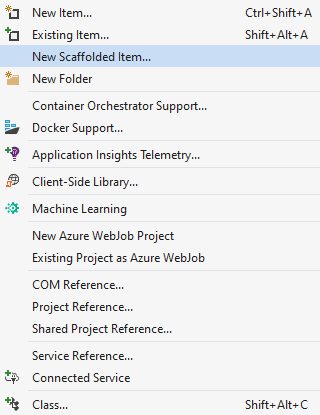
We will use Visual Studio Scaffolder to add identity support. Right click on the Blazor web project and select Add - New Scaffolded Item...
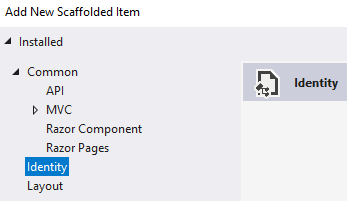
Select Identity from both the left and middle panes in Add New Scaffolded Item dialog.
Error:
There was an error running the selected code generator: Build artifacts not found. Try building the project and then running the scaffolder.
Make sure to select the <MyApp>.Server project then select the new scaffolded item to avoid this error.
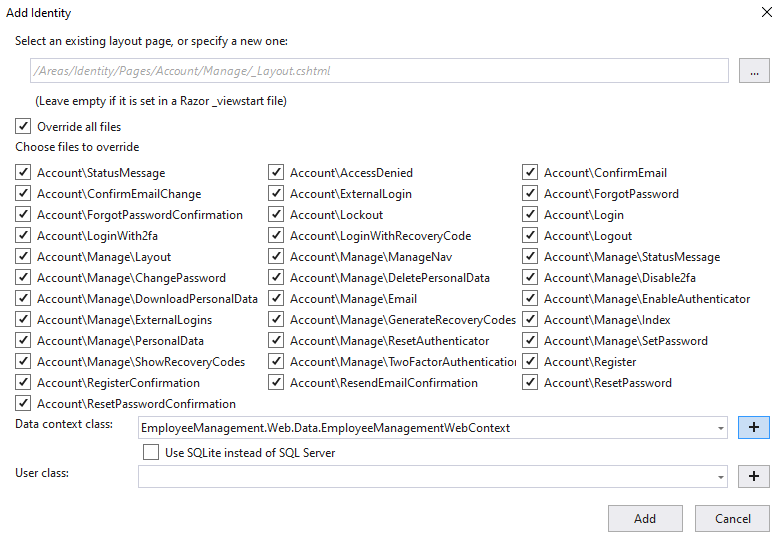
On Add Identity dialog
- Check
Override all files– This adds all the Identity views and classes to our project, so we can modify them to meet our application specific requirements. - Data context class – If your project already has a data context class, select it from the dropdown list. Otherwise, click the plus sign to have it generated.
- Click
Add
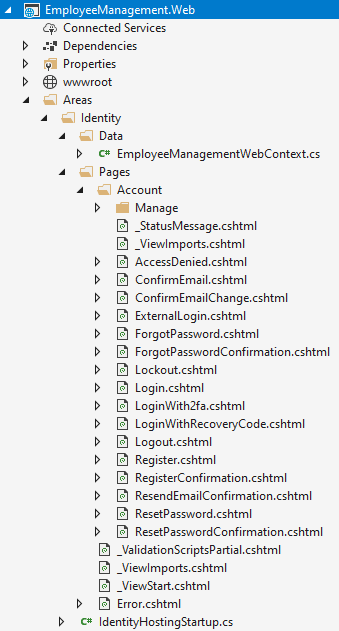
The generated identity files are stored in Areas/Identity folder.
Add and execute identity migrations
Open Package Manager Console and execute the following command add a migration
Add-Migration IdentitySupportExecute the migration
Update-DatabaseNote: Run the above NuGet command only if the database has not been setup. If the database has already been setup, point the connection string to the existing identity database in appsettings.json.
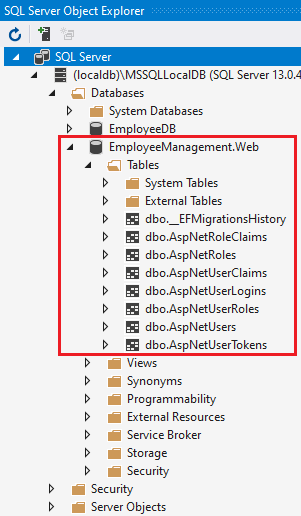
Generated Identity Tables
You can see the generated Identity tables using the SQL Server Object Explorer in Visual Studio. The database connection string is in appsettings.json.
Sources:
https://www.pragimtech.com/blog/blazor/asp.net-core-identity-setup-in-blazor-application/
Comments